Introduction
Well, let me first introduce myself. My name is Daniel, I am rather happy Brazilian currently living in Beijing, China.
I am technology fan, and from childhood I started to become very interested in computers and other eletronic gadgets. My working experience is mostly in Software Development. In the beginning it was mostly focused on the .NET platform (from 2004 until 2011) on the Windows environment, later on I started to learn Unix systems, software testing. The programming l use in my daily work are mostly Python, Node.js, and recently I started to learn Go as well.
Currently I am working daily with Docker as well, so I will also publish the things I learn about this awesome tool and how to make development easier.
I created this blog with the intent to share things as I learn them, and nothing better to start as sharing on how I built this blog and what are the things I am planning to write in the next few weeks
How I built this blog
In the past, I had many different blogs but I never really was interested in sharing anything in particular. Now that I am more mature, almost 30, and more involved with interesting things, I believe it is the right time to start a new blog.
TL; DR
Hugo, Markdown and GitHub Pages are amazing tools to get started fast, and build your own blog without any maintainance cost. Deploy online building with Wercker and we are done.
Engine
My first struggle before I even started was to find a nice platform to host the blog. I could use other stuff available like Blogger, Wordpress, and the likes, but there are a few problems:
Most of these platforms are not available in China due to the Great Firewall of China
They are not geeky enough. I had some experience with helping friends build their websites/blogs using those CMS tools, and the general experience is not that pleasant.
My second option was to start from scratch: Pick a language, like Python, a framework, like Django or flask, and code everything myself. I took some time to consider and in the end I decided to use something different, something I had not tried before. With some googling I discovered Jekyll, Github Pages, and I immediately started to find ways to get it working and to start developing.
I basically had a good start, but after a incident, I lost my computer before I could commit and push to Github :(
A few more things happened, and I finally have a computer again to play with but a busy project at my current job kept me busy enough. We just had some holidays here in China the last few days, so I decided to get started all over again. While looking for Jenkyll and some other material, I met Hugo
It was a good match. First because its performance seemed very impressive, all comments around the tool are good, and mostly because it achieves the same that Jekyll achieves, but it was developed with Go, which I am very intested.
With one line of code and I downloaded the cli with Homebrew as you can check here.
brew update && brew install hugo
You can also check their Quickstart to get a few more details on the process.
After that I just started a new Hugo site with huge new site blog in a folder, and the basic structure was already there: v0.16 at the time of writting
$ tree
.
├── archetypes
├── config.toml
├── content
├── data
├── layouts
├── static
└── themes

6 directories, 1 file
All the folders are empty, but the basic structure was already there.
Now lets get some theme to start of. I currently use HugoMDL, but honestly this is not what I really desire, so I might change this later on. Here you find some nice options to get you started.
I will pick Robust to get started. Head to your blog folder using the Terminal, and type the following:
git clone https://github.com/dim0627/hugo_theme_robust themes/hugo_theme_robust
This will download the theme into the themes folder inside the blog folder.
Now, to avoid having the .git files of the theme mixed with your own blog files you can do the following:
rm -rf themes/hugo_theme_robust/.git
This will basicaly remove all the git files referencing the theme. You could also fork the theme repo and customize and then push it to Github.
It is very important to create a config.toml. Some themes will provide a template for you, others will give you an example in the themes Github repo. This is the case with Robust. Open the Robust repo and check the example
baseurl = "http://hugo.spf13.com/"
title = "Hugo Themes"
author = "Steve Francia"
copyright = "Copyright (c) 2008 - 2014, Steve Francia; all rights reserved."
canonifyurls = true
paginate = 3

[params]
  disqusShortname = "your disqus id." # optional
Replace all the data with your own and save it as config.toml in your blog’s root folder.
The example configuration is missing just one important detail: The theme we are using. Change the configuration file to the following:
baseurl = "http://hugo.spf13.com/"
title = "My Blog"
author = "The author"
copyright = "Copyright (c) 2016, The author; all rights reserved."
canonifyurls = true
paginate = 3
theme = "hugo_theme_robust"

[params]
  disqusShortname = "your disqus id." # optional
As you can see I already changed a few things and added the theme = "hugo_theme_robust". If you chose another theme just remember to set the theme as the theme’s folder name and you are good.
You can check your website/blog by typing in your terminal:
hugo server
You can specify the port you want to use, and there are other nice stuff you can use with the hugo server command, so check the options with hugo server --help
Navigate to localhost:1313 in your browser and you should see something like this:
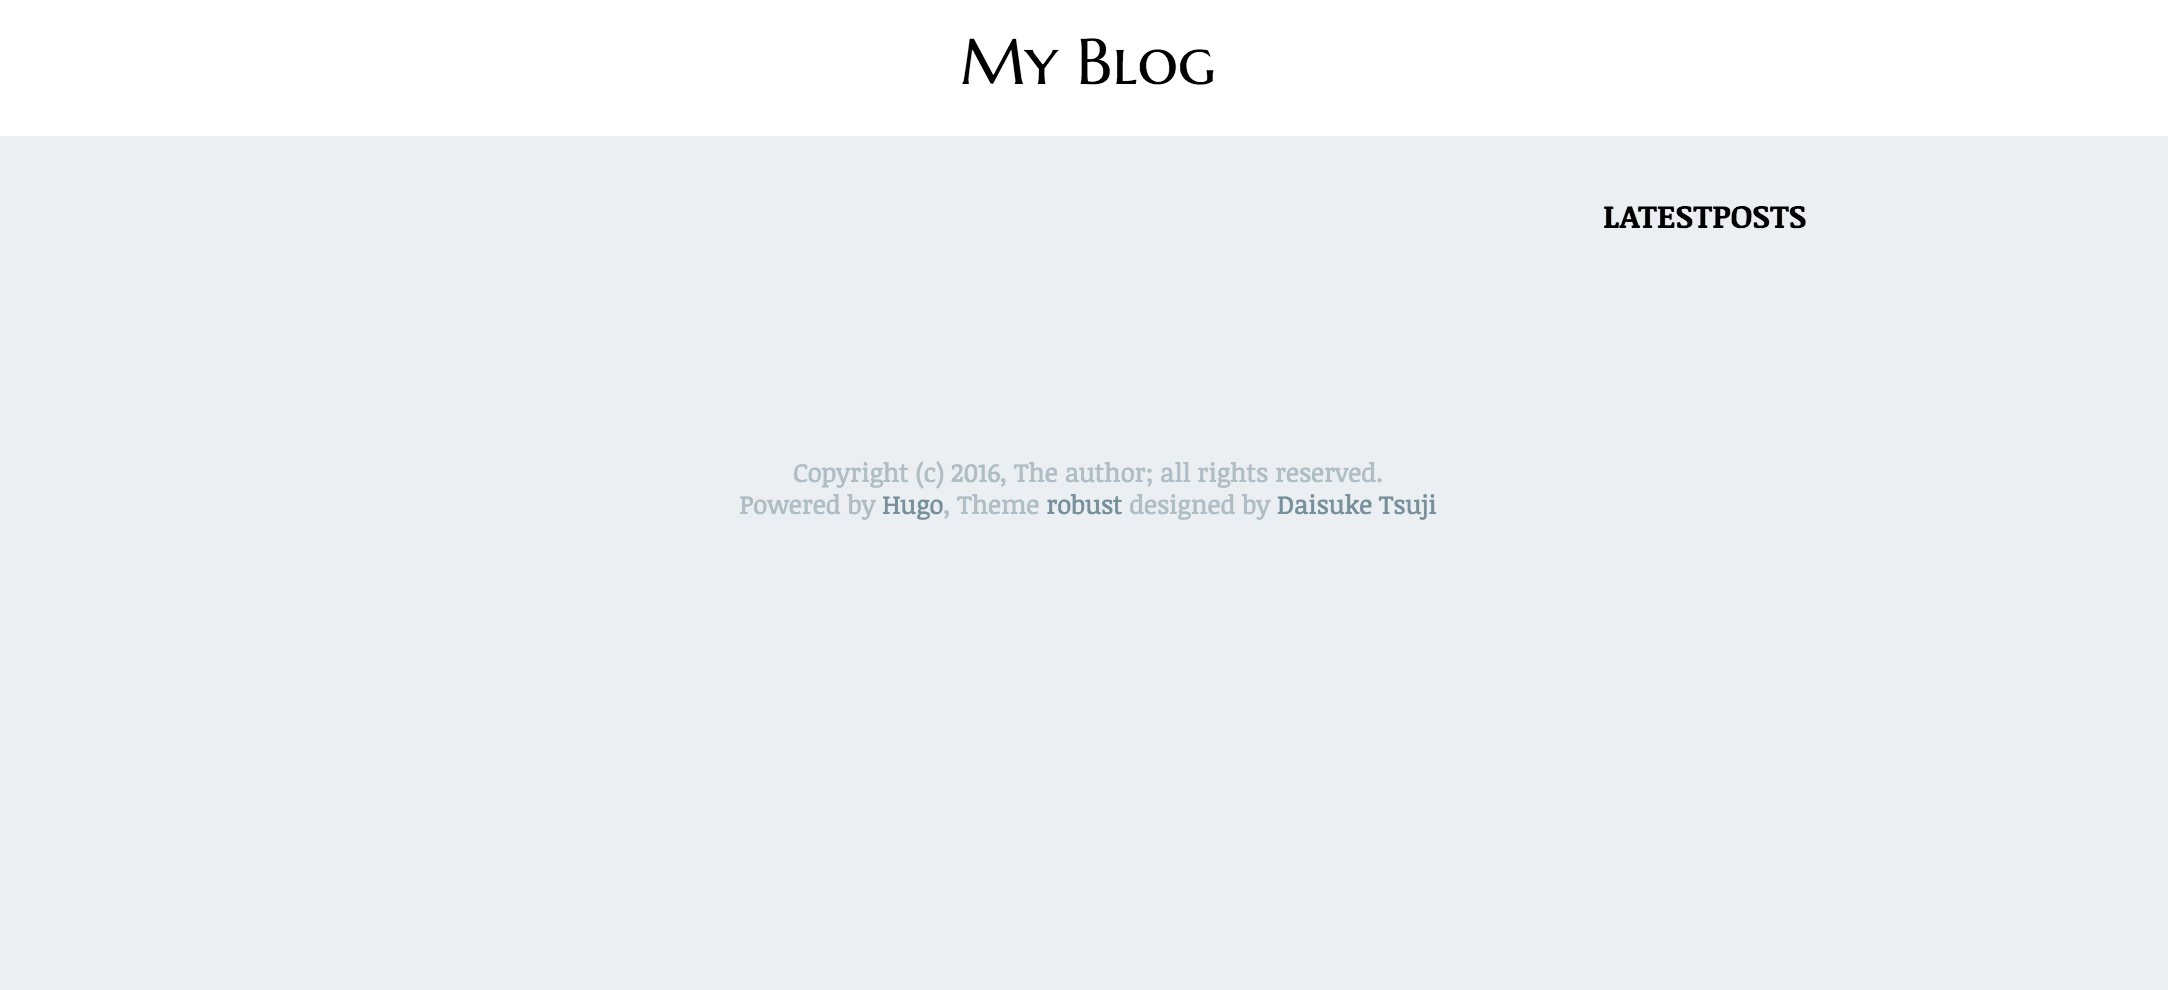
Now, before we create our first post, let’s explore how Hugo works with content. I highly suggest that you take some time to read through the documentation for the content part at least.
In summary, you can create a few folders in the content folder to split your website’s content in different sections. Those sections will be used in the URL to find the content. Some themes will list the posts inside a folder if accessing the folder name in the URL, others will just give you a 404 error. In this sense Robust seems to do a good job. So with a folder structure like the one below inside the content folder:
$ tree
.
├── blog
│   └── new.md
└── test.md

1 directory, 2 files
You should get the following urls to see each one:
- baseurl/blog/new
- baseurl/test
Before we start, notice that the archetypes folder is really important and will save you a lot of time. Our current folder is empty, and our theme doesn’t even have one to start. From the Robust github page let’s see their example:
+++
title = "Getting Started with Hugo"
description = ""
tags = [
    "go",
    "golang",
    "hugo",
    "development",
]
date = "2014-04-02"
categories = [
    "Development",
    "golang",
]

image = "image.jpg" # optional
toc = false # optional.
+++

Contents here
Now lets create an archetype for this example. Create a file archetypes/default.md just changing a little bit the content:
+++
title = "New post"
description = ""
tags = [
    "tag1",
    "tag2",
]
date = "2014-04-02"
categories = [
    "defaultcategory",
    "category1"
]
draft = true
image = "image.png" # optional
toc = false # optional
+++

Contents here
Head back to the terminal and type to following to create a post:
hugo new post.md
This will create a new file contents/post.md and if you run your server now you will not be able to see it. I added a draft = true flag to the archetype, and Hugo will only build the file once you set this flag to false. If you want to preview your draft, you can use the flag --buildDrafts with the server command.
Now open your favorite text editor or markdown editor and edit the contents/post.md file. You should see something like this:
+++
categories = ["defaultcategory", "category1"]
date = "2016-06-19T12:22:46+08:00"
description = ""
draft = true
image = "image.png"
tags = ["tag1", "tag2"]
title = "post"
toc = false

+++

Contents here
I use two markdown editors that I like a lot, one is Typora which is a WYSIWYG editor (OSX and Windows), the other one is MacDown, (OSX). Both are great, and if you are just starting with markdown, I would recommend you to use MacDown. It’s help file is all written in Markdown so you can have a good grasp on how it works.
Edit the contents as you like and once you are ready just change the draft flag to false and you should be able to see your blog post.
I downloaded an image from Wikimedia Commons and saved in the folder static/images/image.png and the image.png in your post.md file will display it as a header.
Take some time to explore more and more the functionalities of Hugo and it’s content management, and once we are ready, it is time to deploy to Github Pages
Deploying to Github Pages
Go ahead and setup your Github account if you don’t have one. After that, head to Github Pages and follow the steps to setup your repository to keep the website files.
Initialize your blog folder with git init if you haven’t done that. Head to the Wercker website and signup with your Github account.
After signup, choose to Create your first application or the Create/Application menu. Select the account and the repository you want to setup.
In the next step select the option wercker will checkout the code without using and SSH key and click on Next step. Click Finish and we can start creating our build script
Back to your project root folder, create a wercker.yml file using the following template, but remember to change part of the content if necessary:
box: debian
build:
  steps:
    - arjen/hugo-build:
        version: "0.16"
        theme: hugo_theme_robust
        flags: --buildDrafts=true
Commit and push. You should see the result in the page very quckly, and give it one or two minutes to complete your build:
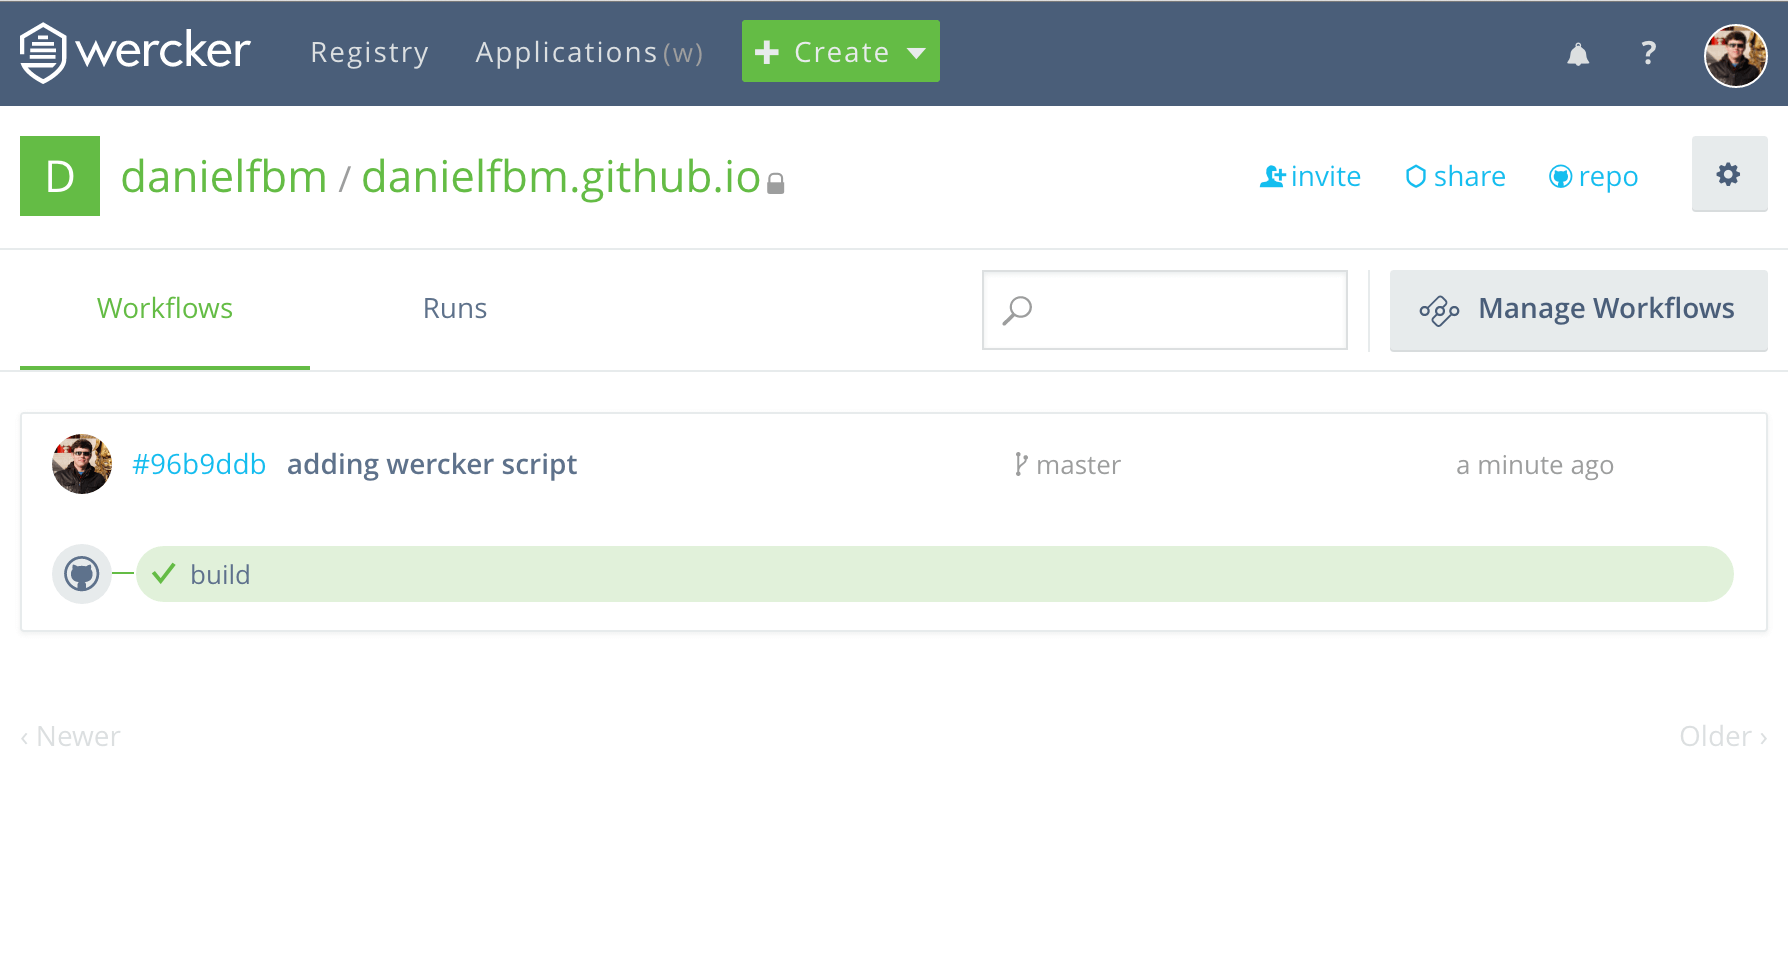
There are a few more steps in order to fully publish the project. Change your wercker.yml build script to:
box: debian
build:
  steps:
    - arjen/hugo-build:
        version: "0.16"
        theme: hugo_theme_robust
        flags: --buildDrafts=true
deploy:
	steps:
      - install-packages:
          packages: git ssh-client
      - halberom/gh-pages@0.2.3:
          token: $GIT_TOKEN
          domain: example.com #optional
          branch: master #option branch to deploy after building. Will override files
          basedir: public
Note: If you are publishing into the useraccount.github.io repository, then you should push to some other branch, like dev and change the wercker.yml adding branch: master. If you are using hugo for a project page, then the HTML should be published to the gh-pages branch
Change the domain variable to a domain that you own or remove the key to use the github.io one. The basedir here tell Wercker to publish the built files to this subfolder. Now head to Github and lets create a token to be able to deploy. Follow this steps to create it, and select only repo in the scopes section.
After generating the key, go back to the Wercker page and tap on the settings button
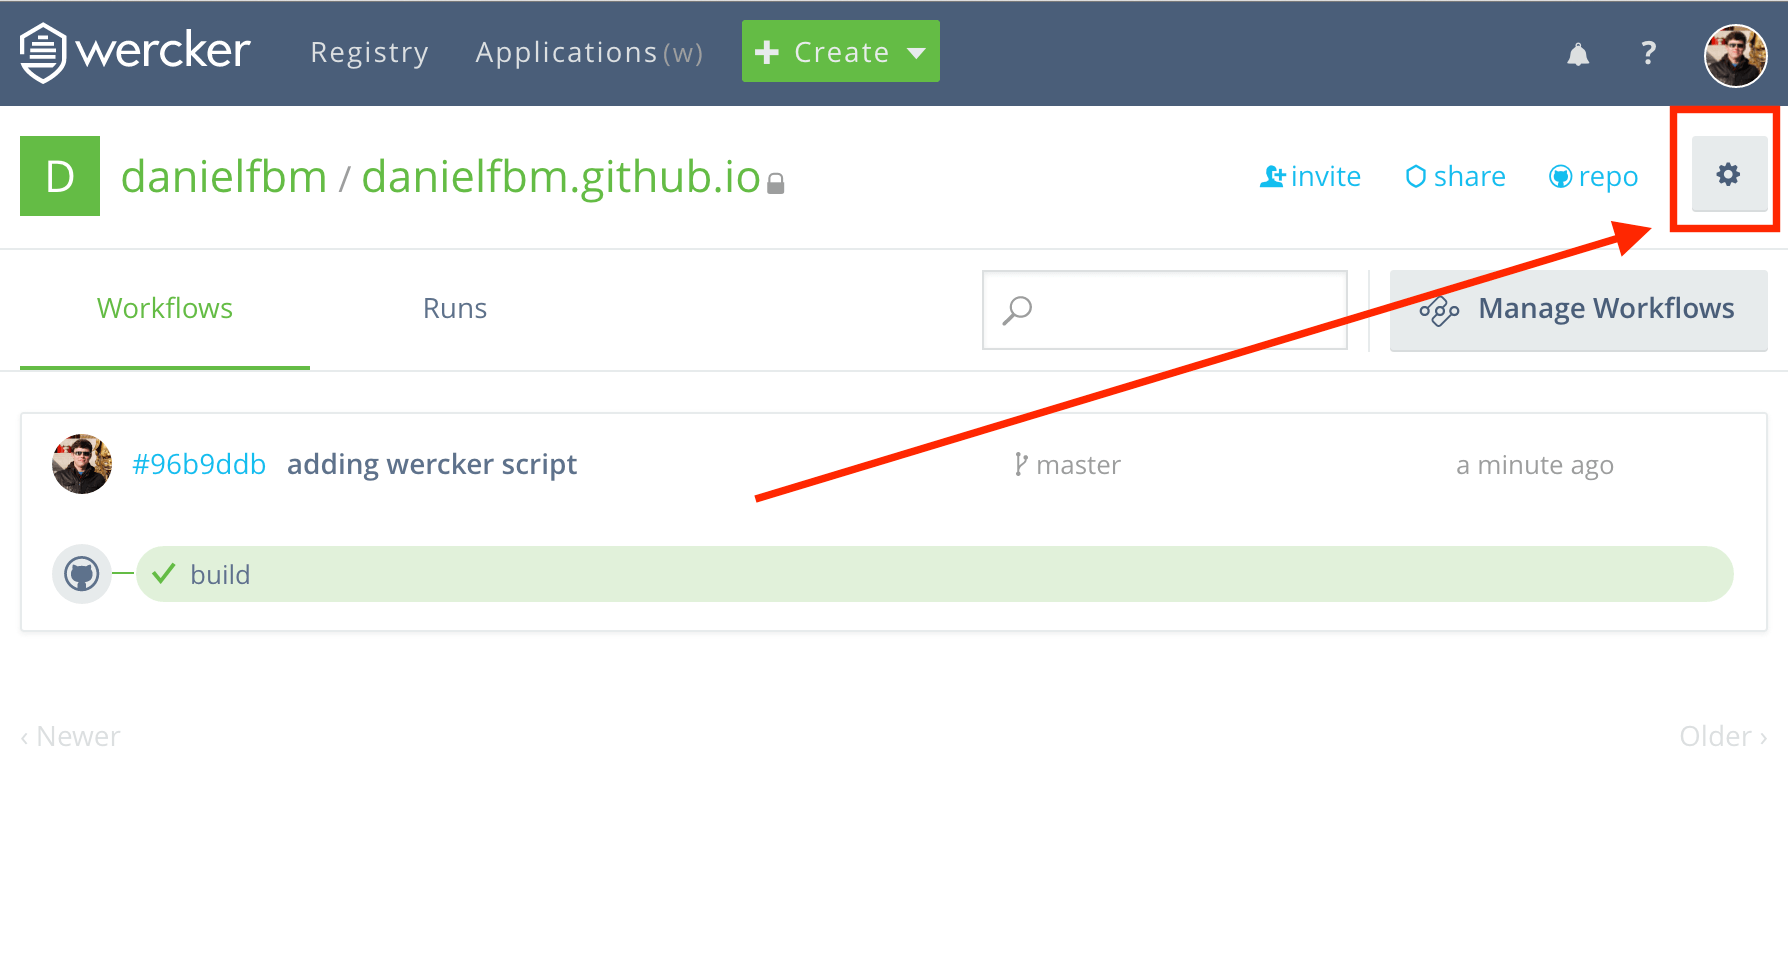
Tap on Environment Variables and add your github token to the GIT_TOKEN key. You can select Protected.
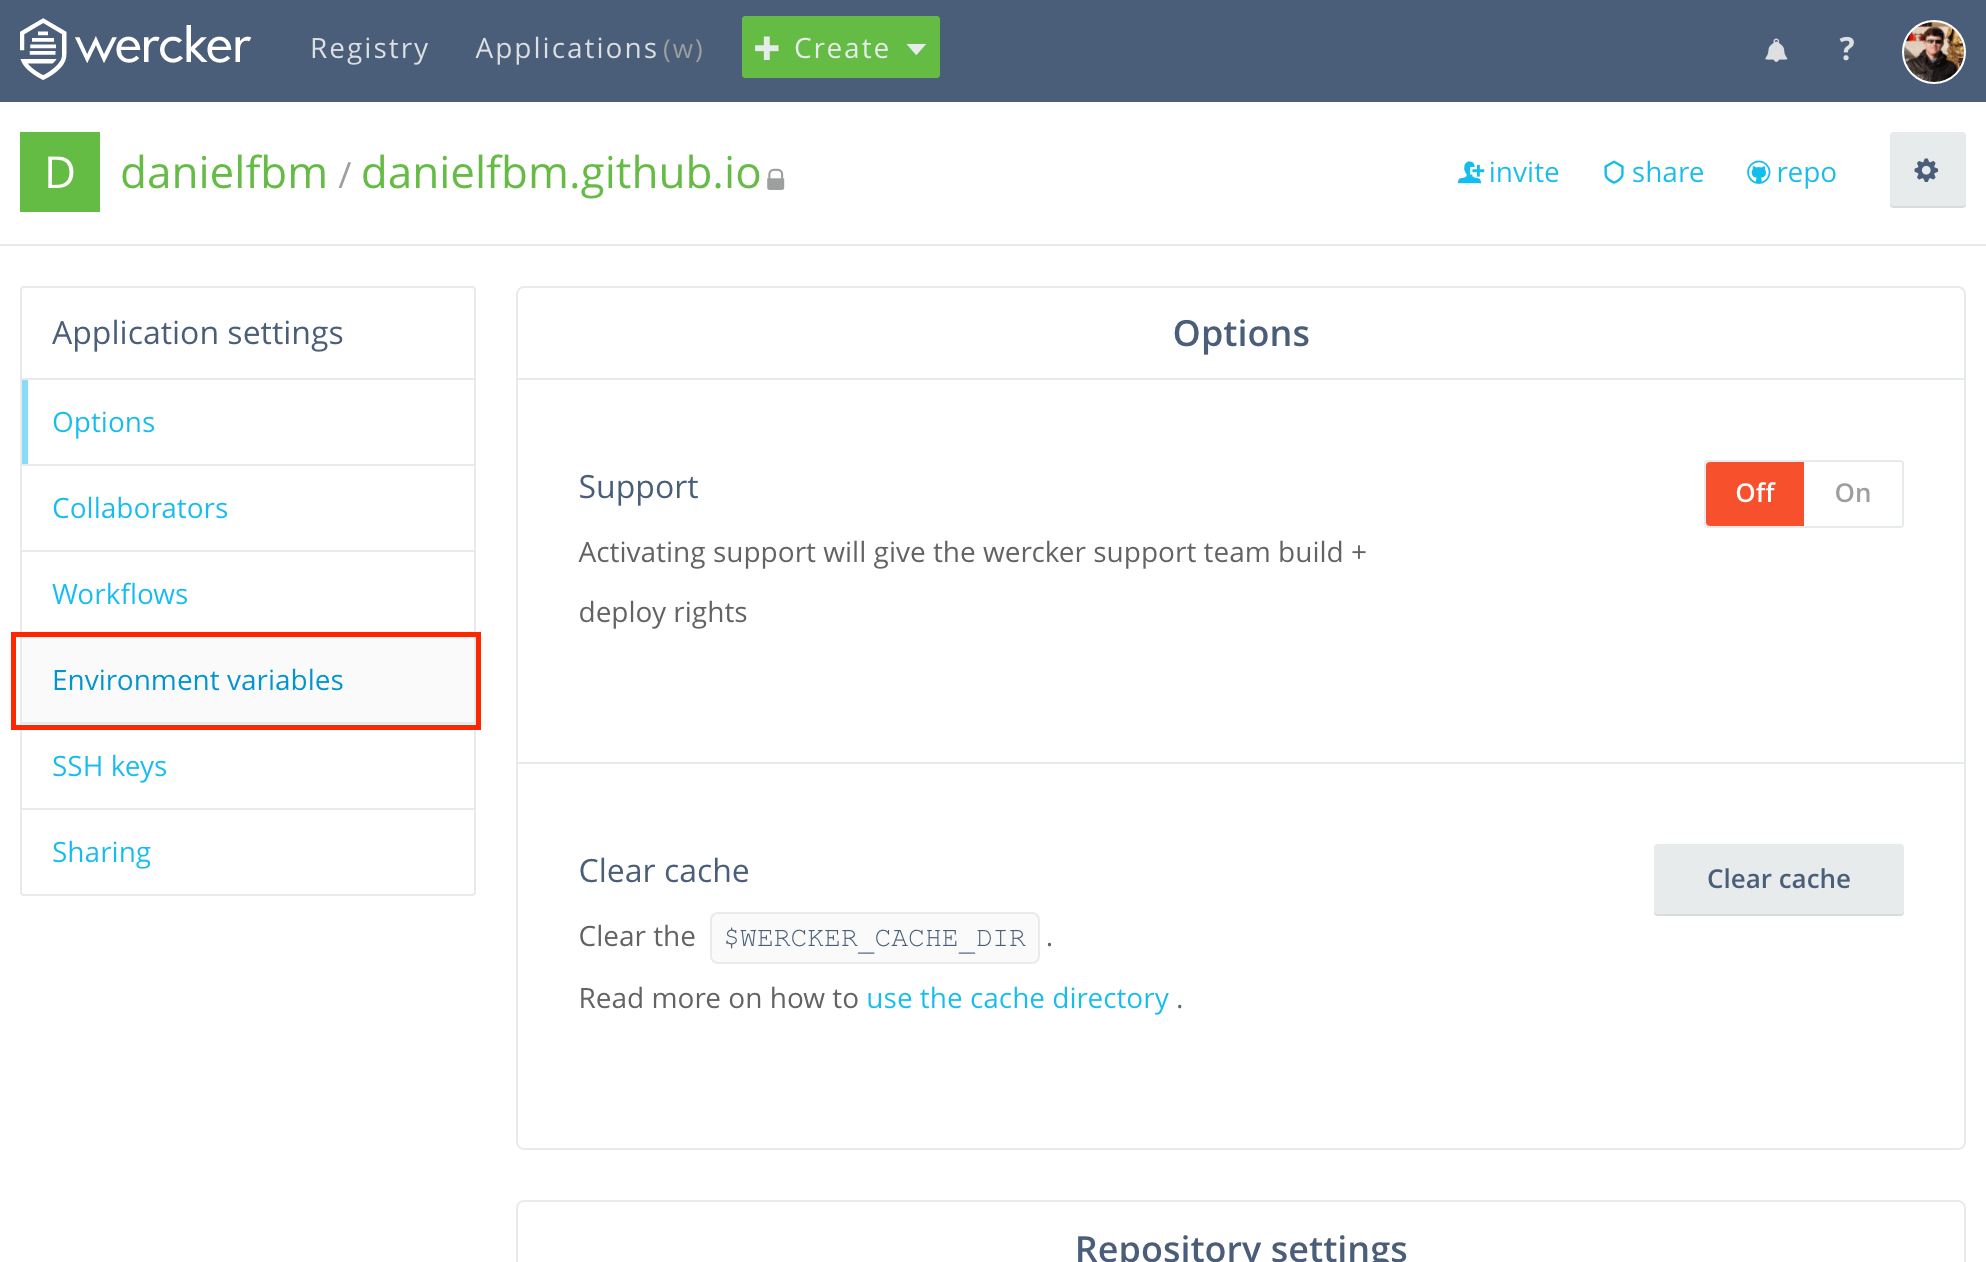
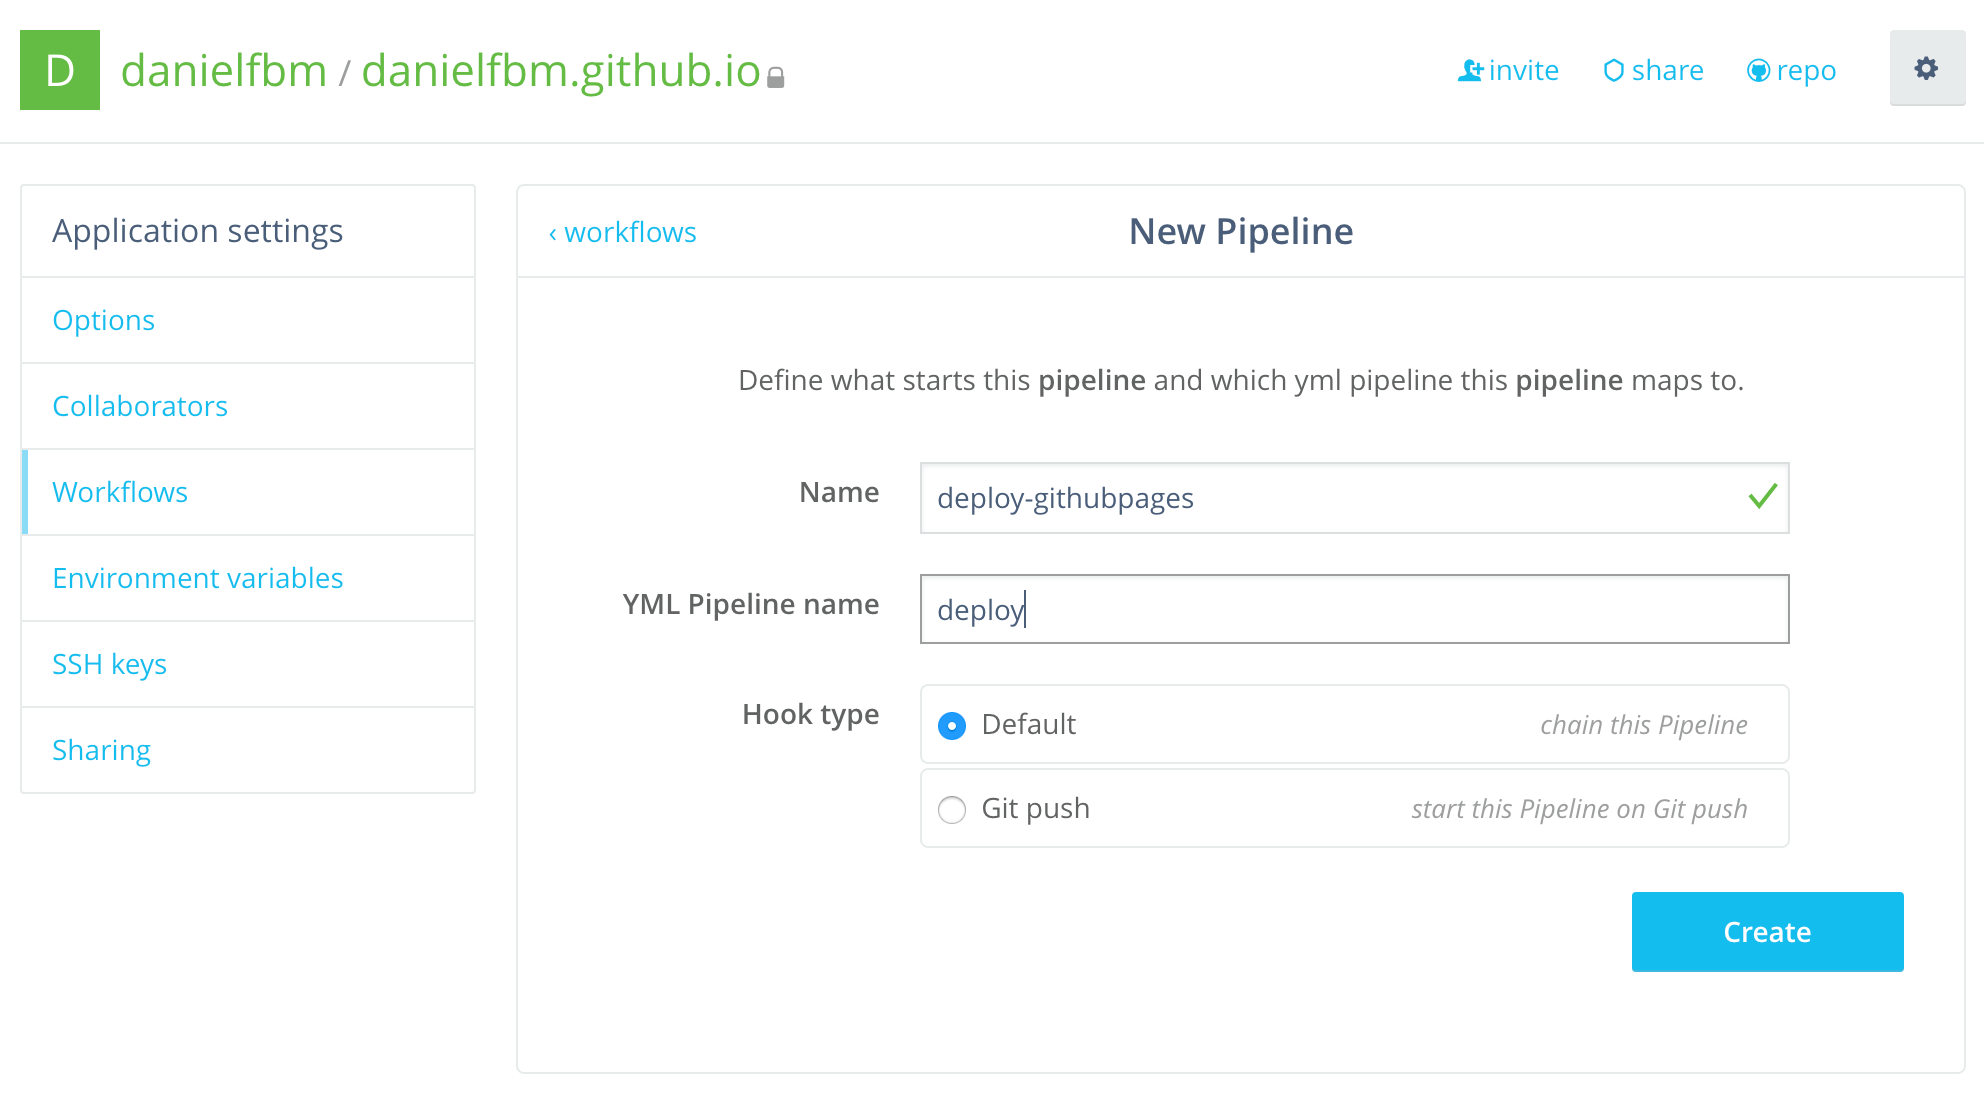
The first time we pushed our project Wercker already created our build pipeline, so now we need to change it a little bit in order to deploy. Still in the Settings page click on Workflows. Create a new Pipeline by click on Add new pipeline in the box below
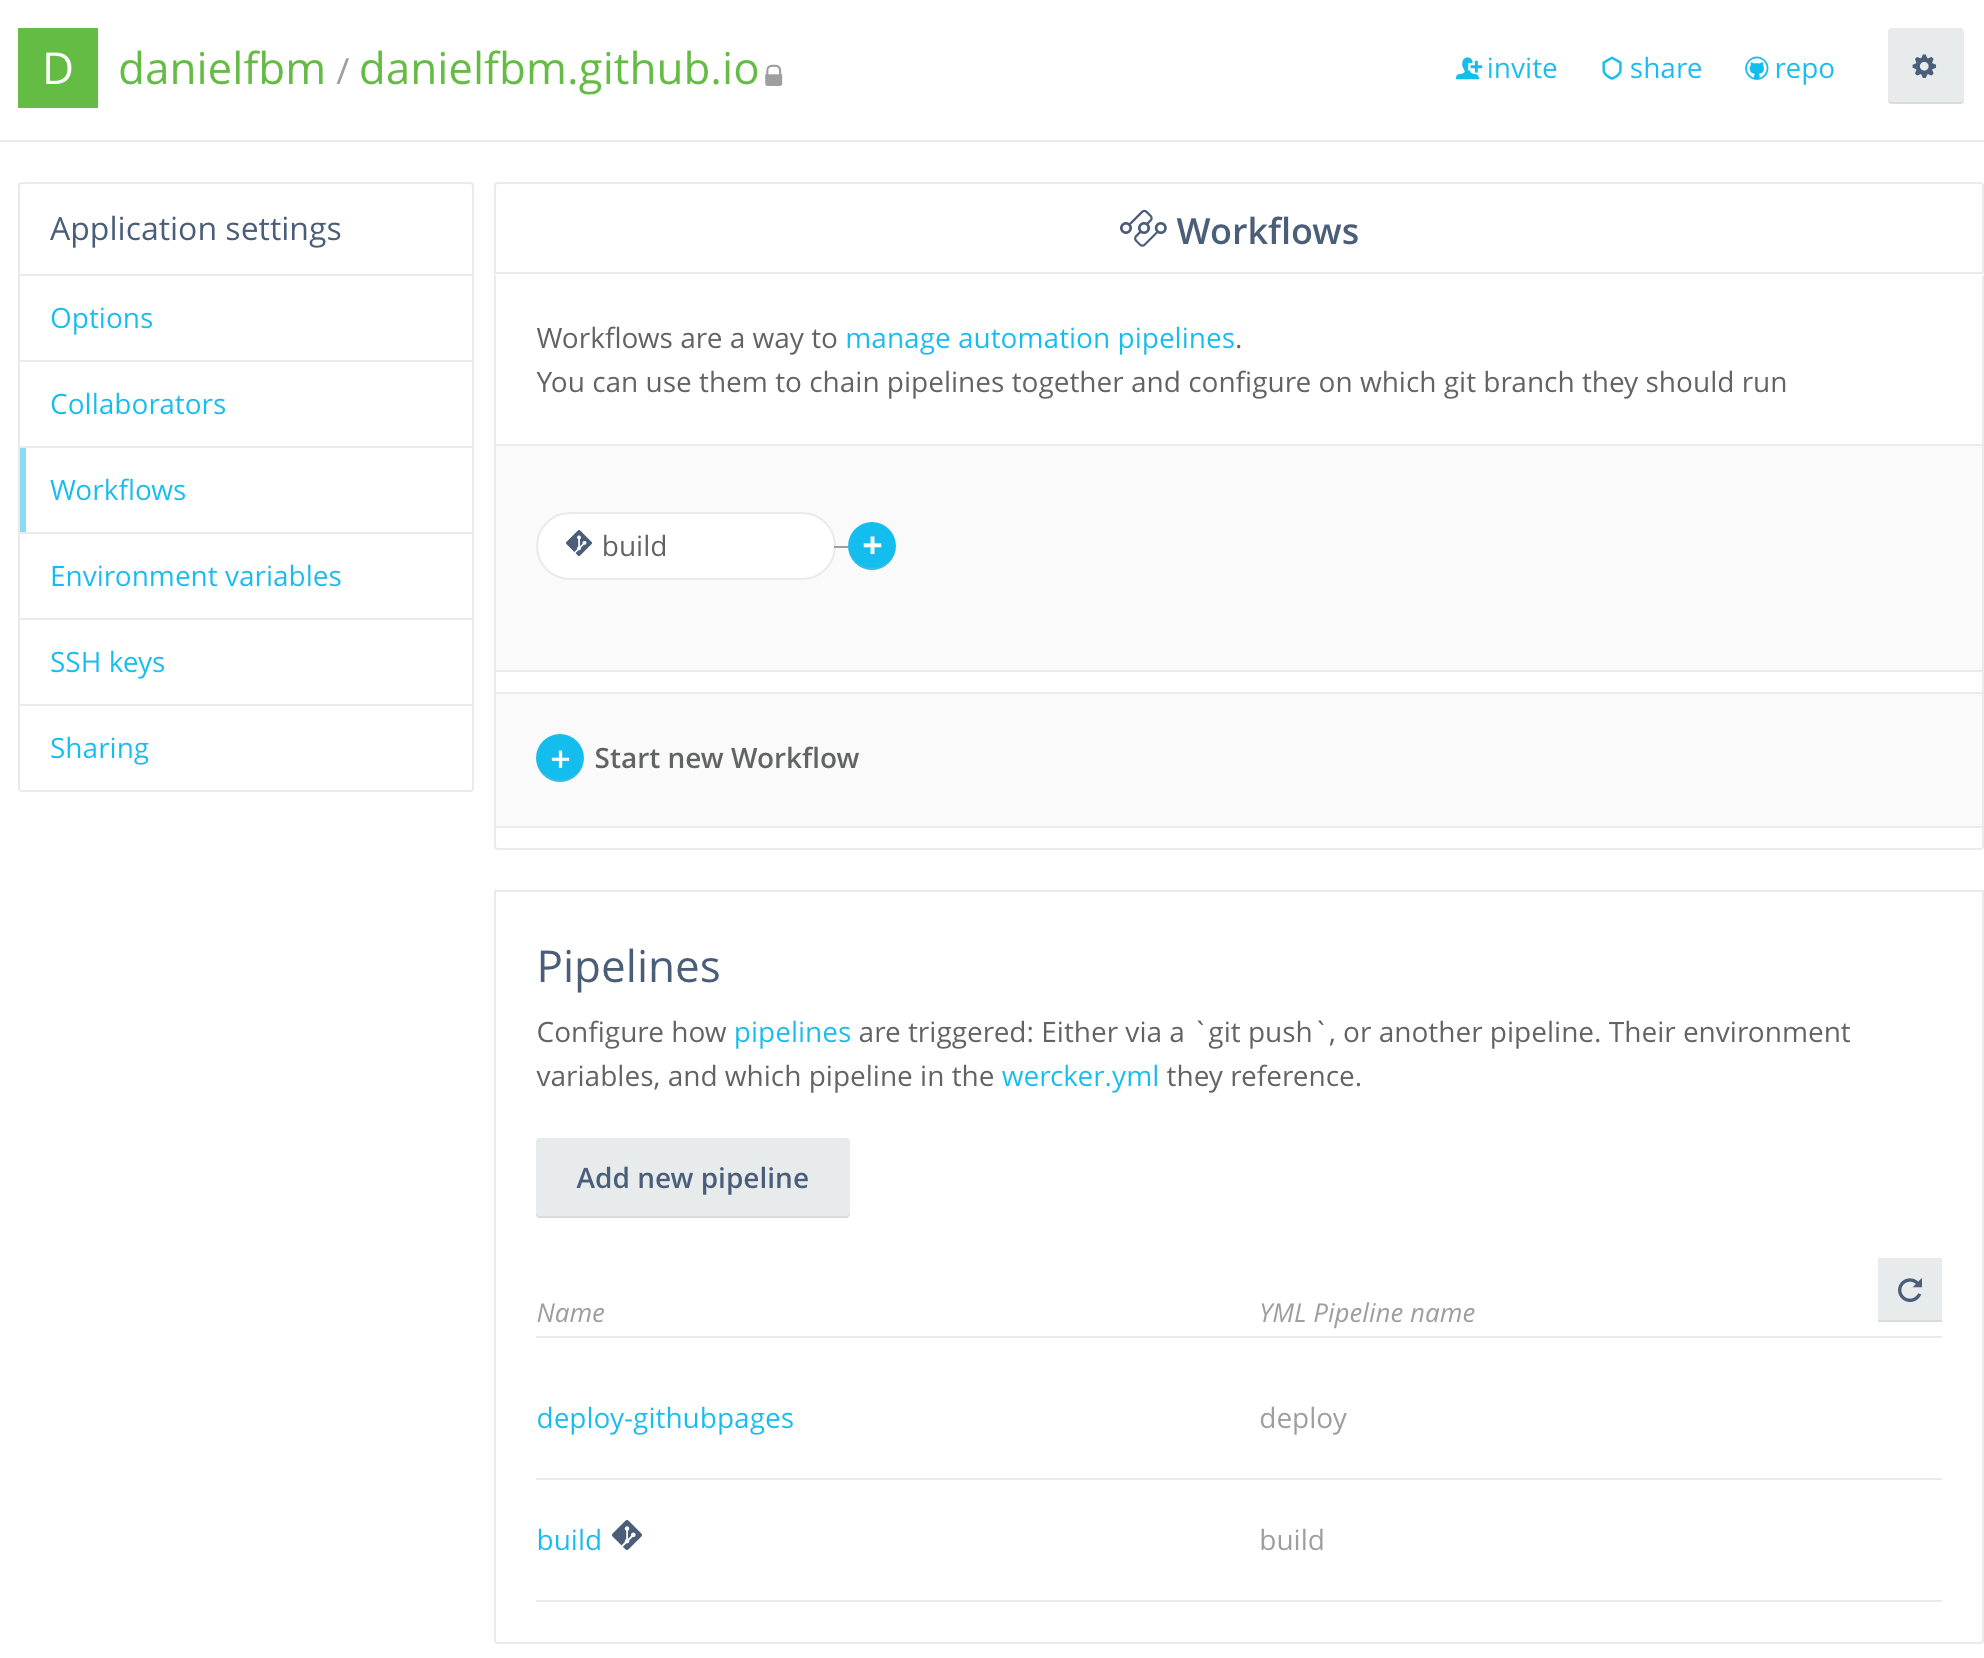
Then add as follows:
Add the pipeline to your current workflow:
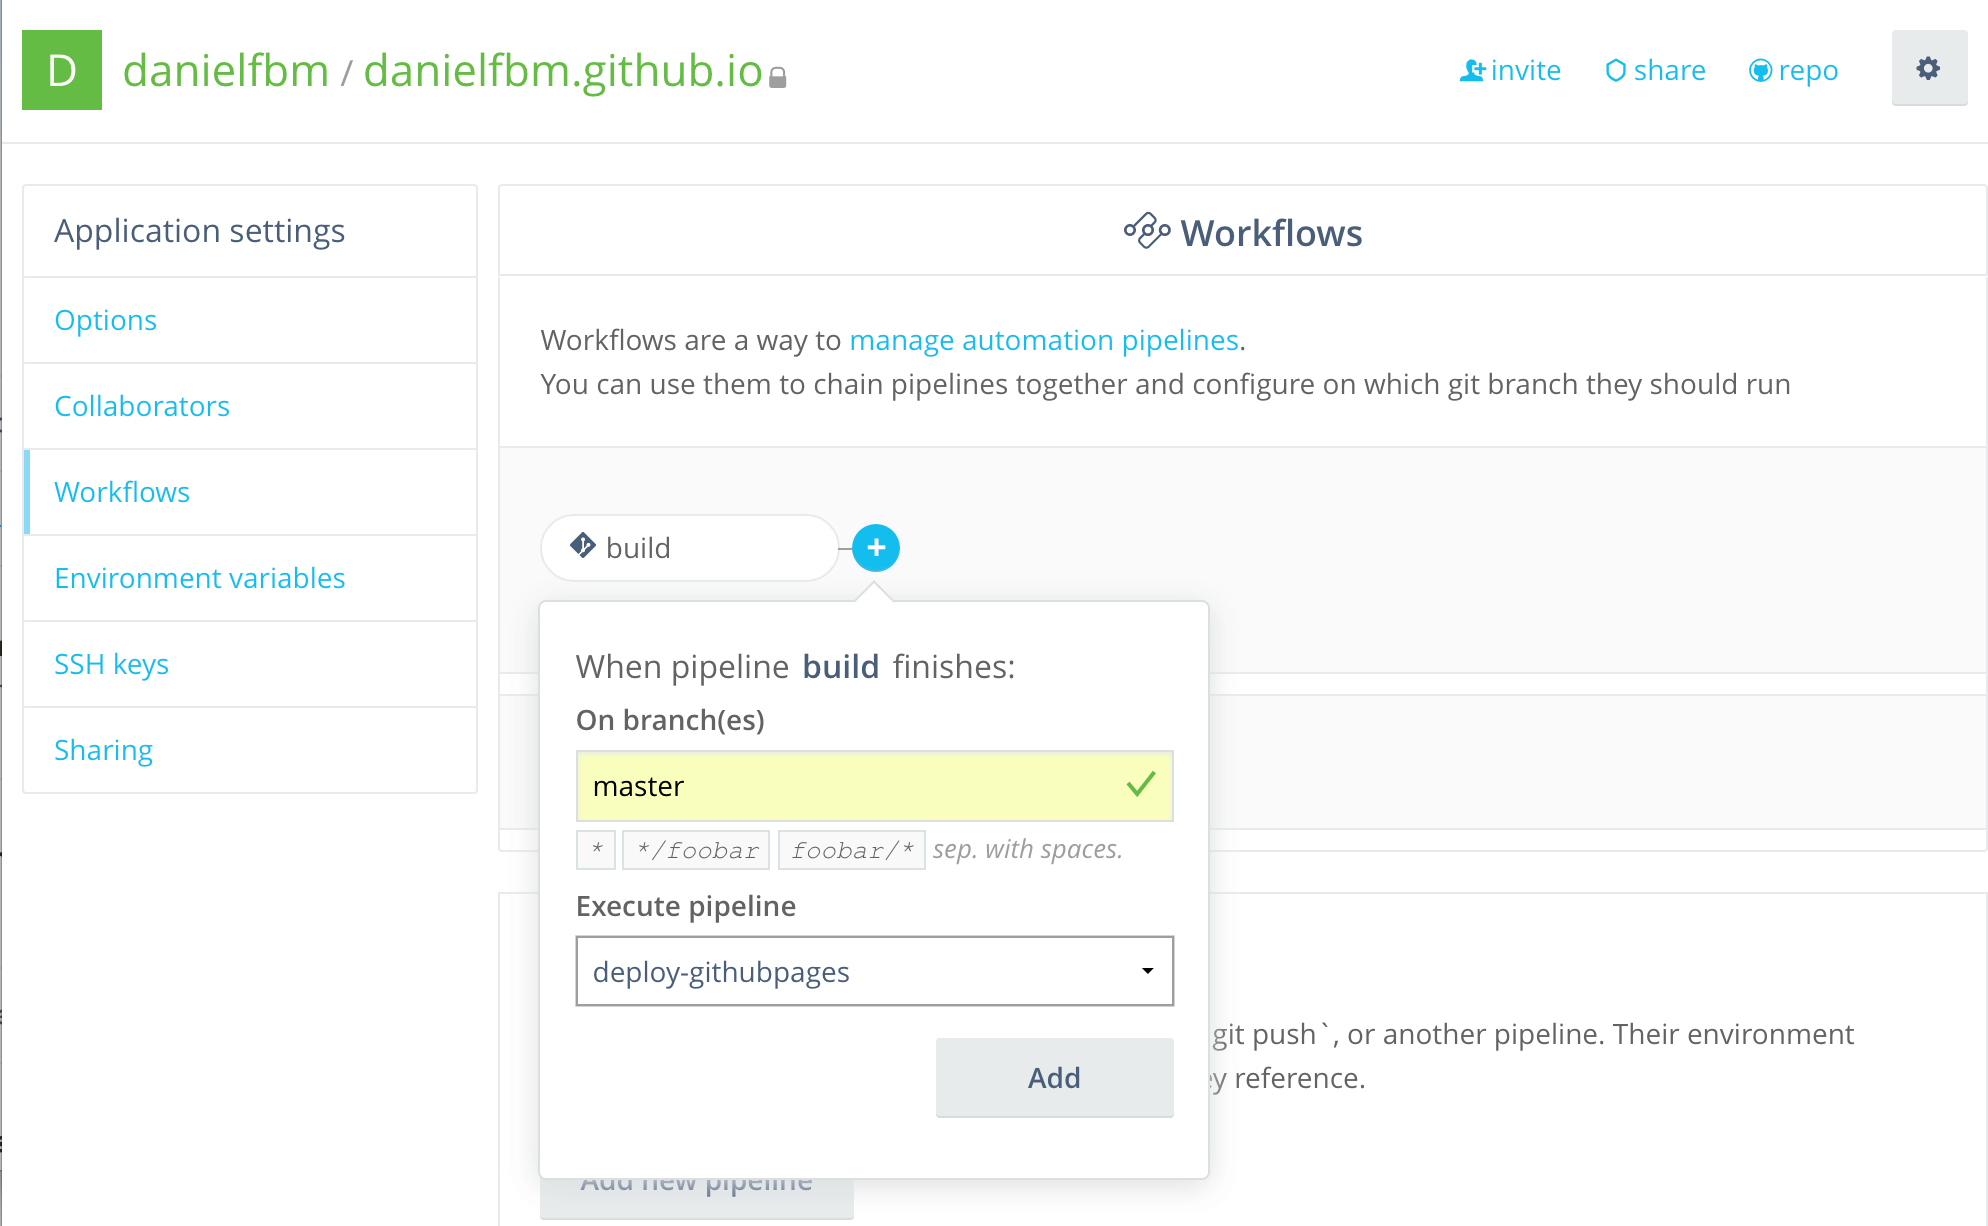
Commit and push and your project should be built automatically. From now on, everytime you push changes to master for a project page, or any other branch for a username.github.io page, Wercker will take care of building and deploying everything for you.
Note: If you are publishing into the useraccount.github.io repository, then you should push to some other branch, like dev and change the wercker.yml adding branch: master. If you are using hugo for a project page, then the HTML should be published to the gh-pages branch
Next steps
For my next post I will introduce a sample project which will be split in a series of posts actually. We will build a Tasks application. In this series we will learn a few things including:
- A Simple Microservices Architecture: Building for Scale;
- How to build a Task backend service using MongoDB as datastore;
- How to build a API Gateway for our Microservices App;
- How to build a Web UI using Angular.js and Angular Material;
- How to optmize our development routine using Docker and other tools;
- How to apply some basic Continuous Integration in a different way;
- How to setup and deploy automatically all of our services independently;
Note: I might change the content and subjects, and also I am open for any suggestions. If you would like to more about some topic, please leave a comment below.